With FactoryTalk Optix, you can build HMI applications with multiple screens. At runtime, you can use two different types of containers to navigate between screens. Those containers are the Navigation Panel and the Panel Loader.
In this tutorial, I’ll show you the basics of how both of these panels work.
Before we continue, I want to point out that the project in this tutorial was built using FactoryTalk Optix version 1.7. If you’re using a different version of FactoryTalk Optix, you may not be able to follow the tutorial exactly.
Since this tutorial focuses on navigating between screens, I have created an Optix project and added five screens to the project. Each screen has some text that identifies it.
.png)
The easiest way to build a navigation system in an Optix project is to use a Navigation Panel.
You can add a Navigation Panel to a project by right-clicking on an object, in this case the Main Window, and selecting New > Containers > Navigation Panel.
.png)
After adding the Navigation Panel to the project, I set the Horizontal and Vertical Alignment of the Navigation Panel to be Stretch so that it takes up the full Main Window.
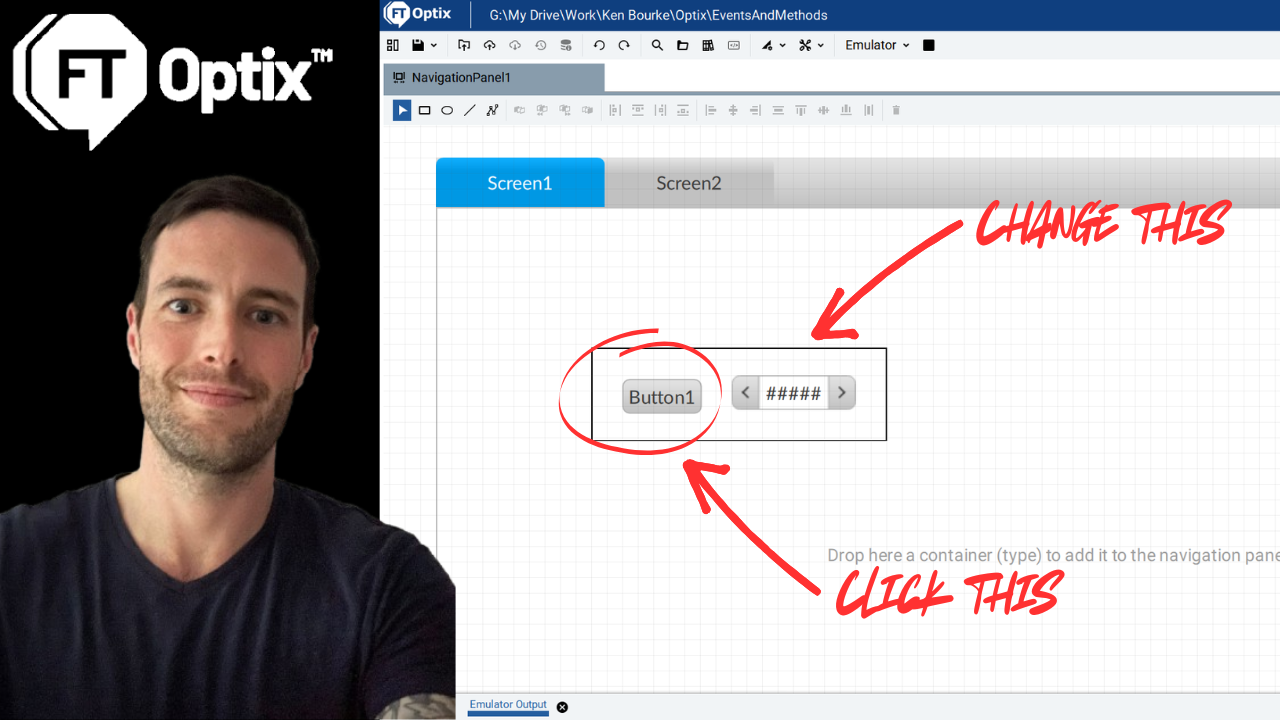
To build the navigation system, I can simply drag screens from the Project View and drop them on the Navigation Panel. As each screen is dropped, a new tab is created for it on the Navigation Panel.
.png)
In the properties pane for the Navigation Panel, I can configure properties for each screen including;
Title which is the text that will be displayed in the tab,
Image path which can be used to display an image in the tab instead of text,
Enabled which let’s a user click on the tab,
Visible which controls if a tab is displayed in the ribbon or not.
.png)
I can also change how the tabs look using the Appearance properties of the Navigation Panel, including the position of the tab list.
.png)
When I run the project, I have a simple navigation system that lets me move from screen to screen.
.png)
Another way that I can build a navigation system is using a Panel Loader container.
To demonstrate this, I have created a new window in the project. In this window, I have added a Panel Loader and a row of buttons that we will use to navigate between screens.
.png)
In the properties pane of the Panel Loader, I can define the default screen to be displayed as well as the animations that will be used when a new screen is loaded.
.png)
To change the screen being displayed by the Panel Loader, we can use the Change Panel method which is part of the Panel Loader. In this example, I will trigger that method when a Mouse Click event occurs on any of the buttons at the bottom of the screen.
To do that, I add a Mouse Click event to each button and link that event to the Change Panel method of the Panel Loader as shown here.
.png)
In the arguments for the method, I select the new screen that I want to be loaded as shown here.
.png)
To test the Panel Loader, I set Window1 as the Start Window in the properties of the Native Presentation Engine.
.png)
Then I run the project and make sure that I can use the buttons to navigate from screen to screen.
.png)
Now you should know how both the Navigation Panel and the Panel Loader work in FactoryTalk Optix and you should be comfortable building simple navigation systems in FactoryTalk Optix projects.
If you want to use this project as a reference, you can grab it from GitHub here:
https://github.com/kencbourke/Optix-Navigation
While working with the Panel Loader, we touched on the concept of Events and Methods in FactoryTalk Optix. In my next tutorial, I would like to look at Events and Methods in more detail since they are a really important and not very intuitive part of Optix.
Subscribe to the mailing list if you want to be notified when that tutorial is available.
Get new content delivered straight to your inbox:
.png)