Git is a distributed version control system that has been used in the software development industry for a very long time. It is a proven technology that is making its way into industrial automation in different ways.
In newer development systems like FactoryTalk Optix and FactoryTalk Design Studio, it is supported natively.
In older development systems like Studio 5000 Logix Designer, utilities are being developed to add support for Git.
This tutorial is for controls engineers who may have heard of Git but aren’t quite sure what it is, what it does, or how it works. It will cover all of those topics and lay the foundation for my tutorial explaining how to use Git as a version control system for Studio 5000 Logix Designer.
Let’s get started with a quick introduction to Git.
Git is a Distributed Version Control System. Let’s break down what that means.
A Version Control System is a piece of software that records changes to a set of files, known as a repository, over time.
With Git, you can see who made changes to a file, what changes were made to a file, when the change was made, and why the change was made.
You can also compare different versions of the repository and, if needed, roll back to a previous version.
This is a huge improvement over the traditional version control system that we use in industrial automation, which is storing loads of copies of a project in a shared folder with weird and wonderful names.
A Distributed Version Control System is a particular type of Version Control System where every user has a complete copy of the repository on their local machine.
The distributed aspect of Git gives it built-in redundancy since the project isn’t lost if one computer breaks, and allows everyone working on the project to work offline.
To sync the different copies of the repository, users push their changes to a remote repository and pull changes from the remote repository to their computer. A remote repository is a copy of the repository that lives on an external server or platform like GitHub or Bitbucket.
That might sound a bit abstract, so let’s look at how Git works by exploring a simple workflow.
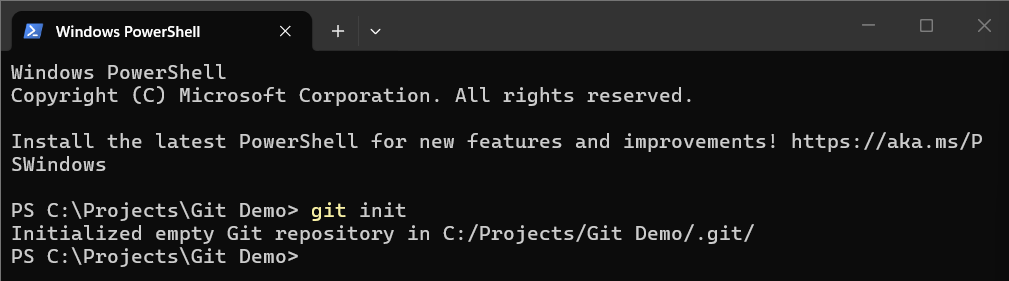
When you start a new project, the first thing that you will do is initialize a new repository. You can initialize a new Git repository in any folder on your computer by navigating to the folder and running the command git init. Obviously, to run this command you will need to have Git installed on your computer.
This repository is the storage space where files are kept, and changes are tracked. This folder is now the working directory for the repository.
Another way to initialize a Git repository is to use the git clone command to create a copy of an existing project. This is great for starting a project from a template or library project.
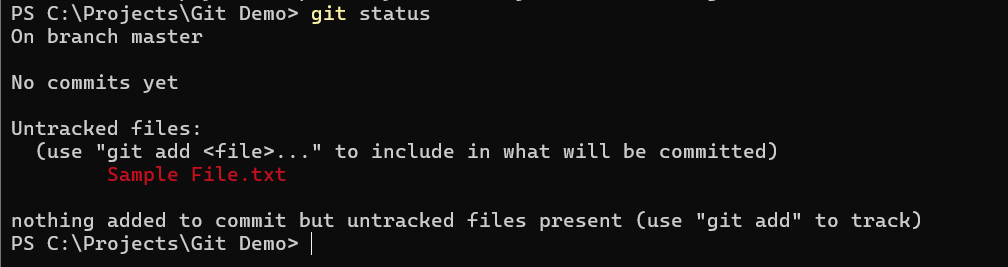
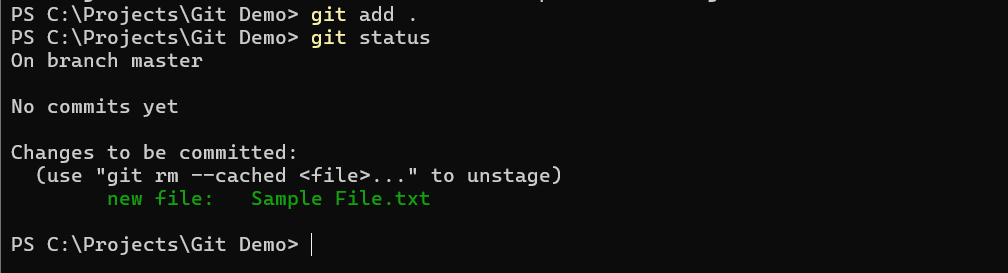
As we add files to the local repository and make changes, we can use the git status command to see the status of the repository.
In this case, I can see that I have one untracked file in my repository. An untracked file is a file that is not being tracked by Git.
To start tracking new files, we can use the git add command. This command adds files in the working directory to the staging area of the repository. Staged files are files that will be committed to the local repository with the next commit.
To add all untracked files in a repository to the staging area, you can use the command git add .
After running this command, you can see that the file has now been added to the staging area.
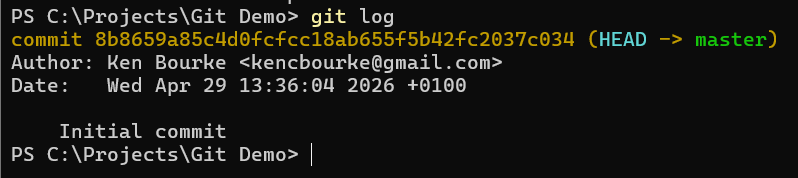
Files in the staging area can be committed to the local repository using the git commit command. When you commit files to a repository, you are creating a snapshot of the repository that can be reverted to later on.
Every commit in a repository should include a message which can be specified using the -m flag with the command.

You can use the git log command to see the commits that have been made in a repository.
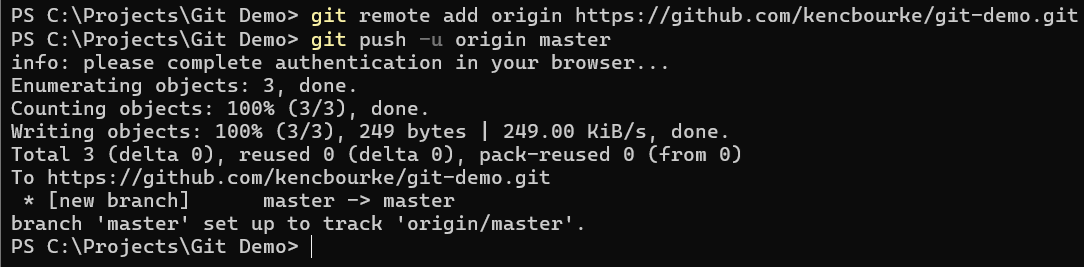
Now we have a change committed to our local repository. To back that change up and make it available to anyone else working on the project, we need to push the change to a remote repository.
First, we need to tell Git where the remote repository is. We do that using the command git remote add origin followed by the URL of the remote repository. In this case, I have created a remote repository in GitHub that I will use for this tutorial.
Once the remote repository has been configured, we can push the changes in our local repository to the remote repository using the command git push -u origin master.
In GitHub, I can see that the repository has been pushed successfully.

I can also open a commit in GitHub to visually see what has changed in the repo.

If someone else had made changes and pushed them to the remote repository, I could pull those changes to my local repository by using the git pull origin master command.

Finally, if you want to roll back to a previous commit, you can use the git revert or git reset.
The difference between these two commands is that git revert reverts a commit by making a new commit, and git reset reverts a commit by rolling back and erasing commits.
In this tutorial, we’ve learned how to use a basic workflow to work with a Git repository.
Specifically, we learned how to use:
Over time, a workflow using these commands looks like this:
This workflow is perfect for smaller projects with one or two developers. On larger projects, you may need to use a more complex workflow that involves branching and merging. We’ll look at branching and merging in the next tutorial.
If you haven’t already, subscribe to the email list to be notified when that tutorial is released.
Get new content delivered straight to your inbox:
.png)